Version 7.1
Chapters:
00:00 – Intro
00:35 – Chapter 1 – Installation
01:40 – Chapter 2 – Ai Routing
04:40 – Chapter 3 – More Maps
06:44 – Chapter 4 – Elevation Profile
07:40 – Chapter 5 – Route Export
08:46 – Chapter 6 – Pro License
10:10 – Chapter 7 – Support us
Kapitel:
00:00 – Intro
00:35 – Kapitel 1 – Installation
01:40 – Kapitel 2 – Ai Routing
04:40 – Kapitel 3 – Mehr Karten
06:44 – Kapitel 4 – Höhenprofil
07:40 – Kapitel 5 – Routen exportieren
08:46 – Kapitel 6 – Pro Lizenz
10:10 – Kapitel 7 – Unterstütze uns
Tutorial – Basics
GS-Route offers powerful route planning features and is super easy to use. This tutorial video explains the first steps in detail. Enjoy!
Kapitel:
00:00 – Installation
01:26 – User Interface
03:54 – Google Streetview
06:04 – Overview Route Planning
06:40 – AR Exports
08:08 – Pro License
10:00 – Route Planning #1
12:50 – GPX File Format
13:16 – Route Planning #2
15:35 – Route Planning #3
20:11 – GPX Cache
21:30 – GPX Archive
GS-Route bietet leistungsstarke Routenplanungsfunktionen und ist kinderleicht zu bedienen. Dieses Tutorial-Video erklärt die ersten Schritte im Detail. Viel Spaß!
Kapitel:
00:00 – Installation
01:26 – Benutzeroberfläche
03:54 – Google Streetview
06:04 – Routenplanung
06:40 – AR-Export
08:08 – Pro-Lizenz
10:00 – Routenplanung #1
12:50 – GPX-Dateiformat
13:16 – Routenplanung #2
15:35 – Routenplanung #3
20:11 – GPX-Cache
21:30 – GPX-Archiv
Overview – Übersicht
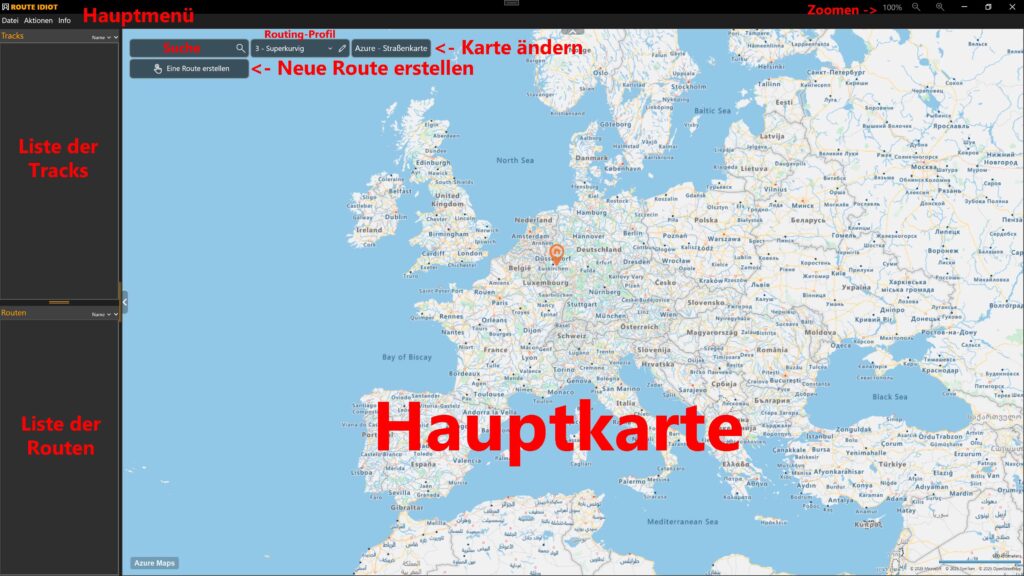
Description – English
GS-Route is incredibly simple! It provides lists of tracks and routes, a map, and that’s it. It couldn’t be simpler. To create a new route, click „Create a route“ and you’re ready to go.
Once the new route is complete, it will automatically be added to the route list. You can select it with the small check mark. Once a route is selected, Export Route will be displayed. Clicking this will open the route export dialog. Here, select the device you want to export to and click Export .
Because all apps and navigation systems can be different, there are different export methods. Different working practices are also taken into account. Users of navigation devices will typically connect their devices to the computer via a USB cable. This works, for example, with:
- Garmin XT
- Garmin XT2
- Garmin Tread
- BMW/Garmin Navigator 4, 5 and 6
- BMW Connected Ride Navigator (CRN)
- TomTom Rider 400, 450, 500, 550
App users can use a cloud drive for export and later access the routes on their smartphone from the cloud drive. Supported are:
- Microsoft OneDrive
- Google Drive
- Apple iCloud Drive
Owners of the new BMW Connected Ride Navigator (CRN) can export their routes via OneDrive, for example, then open them on a smartphone (iOS or Android), and import them using the BMW Connected Ride app. As soon as the CRN has an internet connection, all imported routes will be immediately visible there.
Senic users can export directly to the Scenic cloud without any detours. All routes are then immediately visible in the Scenic app.
Users of MRA, Kurviger, or Calimoto can open all routes directly from one of the three supported cloud drives. When exporting via cloud drive, multiple systems can be selected simultaneously. For example, you can export to a Windows Surface, an iPhone, and an Android smartphone in parallel.
If your travel plans change while you’re on the road, you can easily change everything on a Windows Surface and export it again.
Up to 10 parallel installations on a maximum of 10 private computers are supported.
Beschreibung – Deutsch
GS-Route ist unglaublich einfach zu bedienen! Es bietet Listen mit Tracks und Routen, eine Karte – und das war’s. Um eine neue Route zu erstellen, klicken Sie auf „Route erstellen“ – und schon kann es losgehen.
Sobald die neue Route fertig ist, wird sie automatisch zur Routenliste hinzugefügt. Sie können sie mit dem kleinen Häkchen auswählen. Sobald eine Route ausgewählt ist, wird „Route exportieren“ angezeigt. Wenn Sie darauf klicken, öffnet sich der Dialog zum Exportieren der Route. Wählen Sie hier das Gerät aus, auf das Sie exportieren möchten, und klicken Sie auf „Exportieren“.
Da sich Apps und Navigationssysteme unterscheiden können, gibt es auch unterschiedliche Exportmethoden. Auch unterschiedliche Arbeitsweisen werden berücksichtigt. Nutzer von Navigationsgeräten verbinden ihre Geräte in der Regel über ein USB-Kabel mit dem Computer. Dies funktioniert beispielsweise mit:
- Garmin XT
- Garmin XT2
- Garmin Tread
- BMW/Garmin Navigator 4, 5 und 6
- BMW Connected Ride Navigator (CRN)
- TomTom Rider 400, 450, 500, 550
App-Nutzer können für den Export ein Cloud-Laufwerk verwenden und später von dort auf ihrem Smartphone auf die Routen zugreifen. Unterstützt werden:
- Microsoft OneDrive
- Google Drive
- Apple iCloud Drive
Besitzer des neuen BMW Connected Ride Navigators (CRN) können ihre Routen beispielsweise über OneDrive exportieren, anschließend auf einem Smartphone (iOS oder Android) öffnen und mit der BMW Connected Ride App importieren. Sobald der CRN eine Internetverbindung hat, sind alle importierten Routen dort sofort sichtbar.
Senic-Nutzer können ohne Umwege direkt in die Scenic-Cloud exportieren. Alle Routen sind dann sofort in der Scenic-App sichtbar.
Nutzer von MRA, Kurviger oder Calimoto können alle Routen direkt von einem der drei unterstützten Cloud-Laufwerke öffnen. Beim Export über das Cloud-Laufwerk können mehrere Systeme gleichzeitig ausgewählt werden. So können Sie beispielsweise parallel auf ein Windows Surface, ein iPhone und ein Android-Smartphone exportieren.
Sollten sich Ihre Reisepläne unterwegs ändern, können Sie ganz einfach alles auf einem Windows Surface ändern und erneut exportieren.
Bis zu zehn parallele Installationen auf maximal zehn privaten Computern werden unterstützt.